Tour: Borrow System (User Frontend)
Hello and welcome to the tour about my Borrow System! In this tour I will present you my Borrow System and I will show you how it works.
Disclaimer
This project is a separate instance of the Borrow System. I deleted and deactivated all of the links between the real Borrow System and the demo version of it.
Please be respectful and keep in mind that other persons also want to discover this Application. So that means, please do not delete all entries of it.
Tour
Step 1: Log in, and get started!
When you visit the demo project under https://demo.insta.the1s.de you will get an login mask that should look like this:

There you can enter the demo user credentials:
Username: demoUser
Password: demoUser
Then you will enter the Borrow System and your screen should look like this:

Step 2: Creating a loan
To create a loan, simply enter a start date and an end date for your loan. Then click on Fetch available items and select the items that you want to create a loan for.

Then you can select that items that you want in your loan. If you wish you can enter an optional note so other people know the purpose of your loan.
If the creation of the loan was successful your browser should now look like this:

Step 3: Managing the loan
You have now successfully created a loan! Now you can click on the “My loans” button on the top of the page. This page should appear:

There you can set the Collection date and the return date by pressing the green and blue buttons. You can also delete a loan by clicking on the trash icon on the right side.
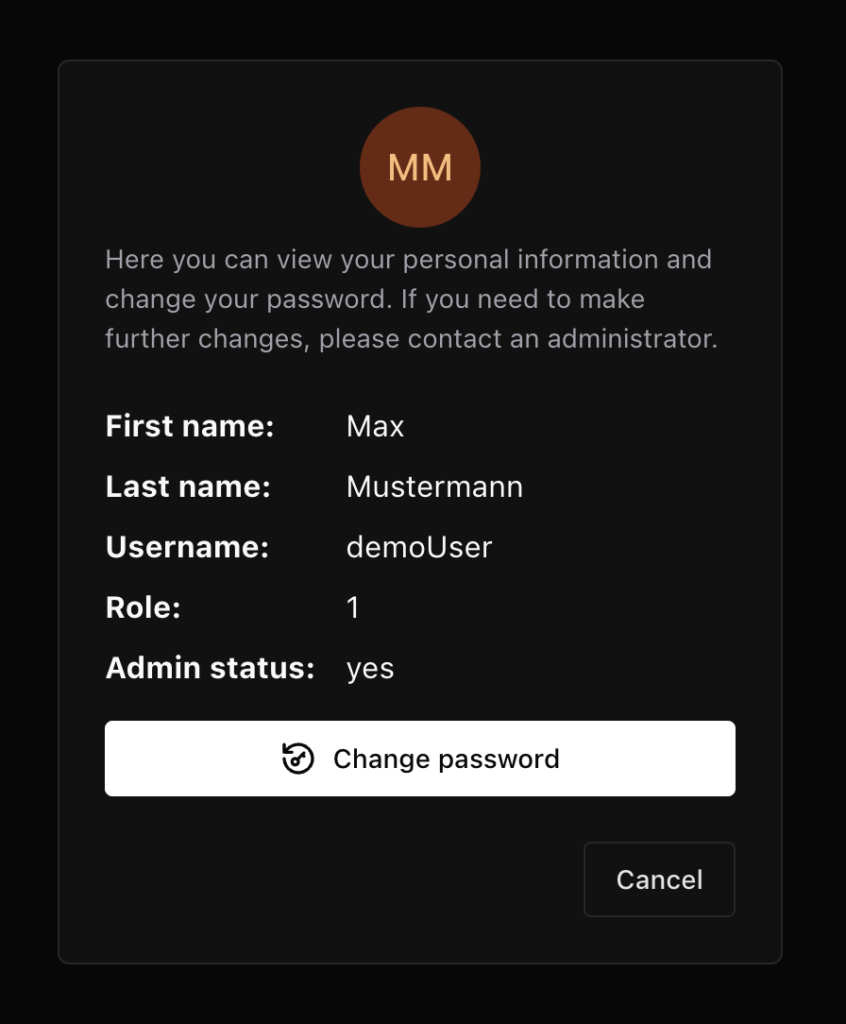
Step 4: Managing your user data
If you now click on the “MM” on the top of your page. This dialogue should open, where you can see and edit your user data.
Keep in mind that the password for the demoUser cannot be changed by the default Frontend.
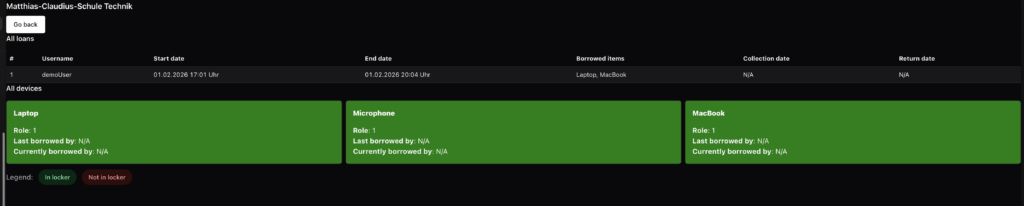
Step 5: Get an overview of all loans
When you now click on the “Overview Page” button on the top of the page, you will get an overview of all loans that are currently stored in the database. You will also see all items that are stored in the database.
Each green and red boxed represent one item. On the top you see the name of the item, and underneath you will see the role that is required to borrow this item and underneath that you can see the name of the last person that has borrowed this item, and below that you can see the person that is currently borrowing this item. If the values of these two names are “N/A” this stands not available and means that nobody is currently borrowing this device or this device has never been borrowed before.

Thats it!
You have successfully completed the tour about the frontend of the Borrow System. But there is still more to explore. I have also build a management tool also known as admin panel. With this tool you can basically edit all entries in the database of the Borrow System. Check it out!